I have a confession to make. For the last three years, my professional headshot has been a selfie I took in my kitchen. The lighting was bad. The background was my refrigerator. And I was wearing a hoodie that had a coffee stain on the sleeve.
I told myself it was fine. I'm not a model. I don't need a studio shoot. But every time I sent that photo to a client or uploaded it to LinkedIn, I cringed a little. Not because I looked bad, but because I looked like I didn't care. And in a world where people judge your competence based on a tiny thumbnail, that matters more than we want to admit.
So I tried something different. I used an AI image generator with a very specific prompt. And the result was so good that I've been using it for everything — LinkedIn, client proposals, even my email signature.
Here's exactly how I did it, the prompt I used, and what I learned along the way.
The Problem With Most AI Headshots
Let me be honest. Before I found this approach, I tried a few AI "professional headshot" tools. They were terrible. They either made me look like a cartoon, or they completely changed my face. One tool gave me a nose I don't have. Another one added a full beard I've never grown. The worst part was my hair — it kept changing styles like I was trying on wigs.
The problem is simple. Most AI tools are trained on generic faces. They don't understand that you want to look like you, just in a better environment. They think "professional image" means "generic handsome man in a suit" or "woman with perfect makeup." And if you don't match their training data, you end up looking like someone else entirely.
What I needed was a way to keep my exact identity — face, hair, everything — while changing everything else. The lighting, the pose, the background, the clothes.
That's when I figured out the prompt structure.
The Prompt That Changed Everything
Here's the exact prompt I used:
I want to break this down because the structure matters more than the words.
Why This Prompt Works
What I realized is that most people give AI too much freedom. They say "make me look professional" and the AI does whatever it wants. You need to be specific. But not just specific — specific in a way that controls the things AI messes up most often.
The identity lock.
I wrote "exact same facial and physical identity" and "do not change my face or my hair." That sounds obvious, but it's not. Most prompts don't include this. They assume the AI will preserve identity. It won't. You have to tell it explicitly. And I also uploaded multiple reference photos — not just one. That helped the AI understand what my face actually looks like from different angles.
The visual constraints.
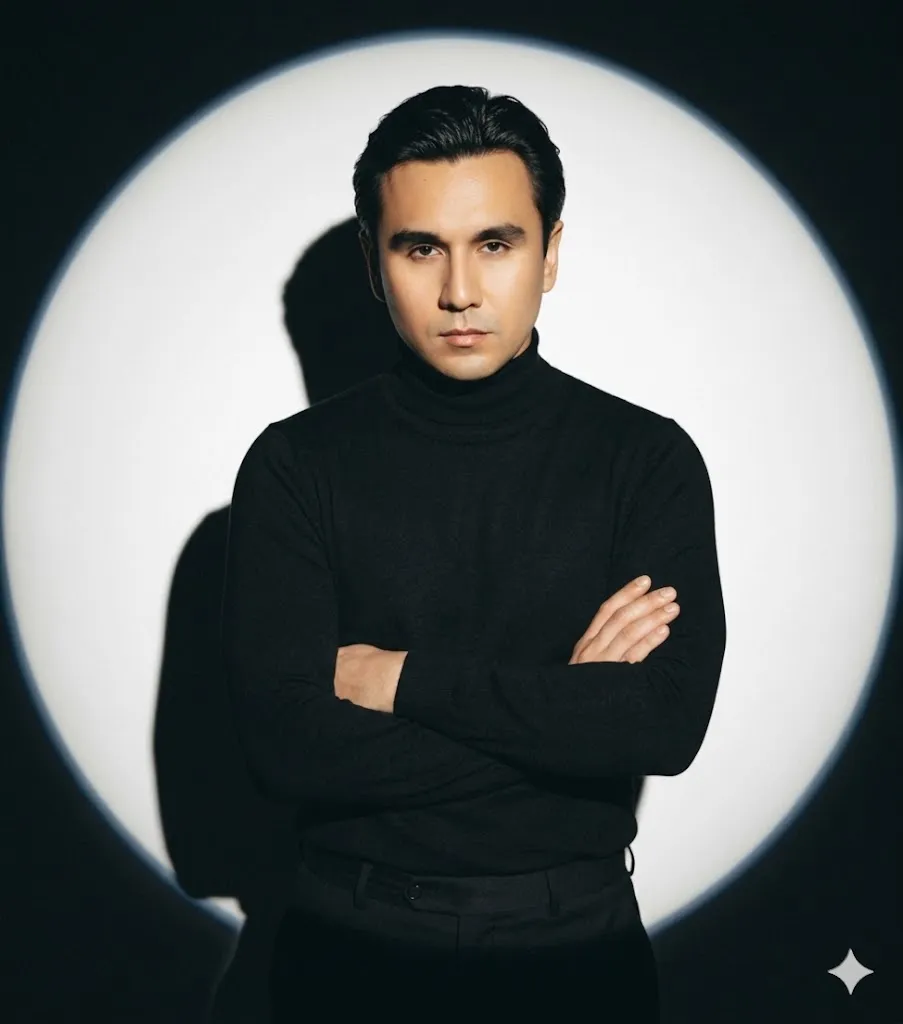
I described the lighting as a "circular spotlight" on a "dark background." This is a specific lighting setup that exists in real photography. It's not vague. It's not "good lighting." It's "a large, bright circular spotlight." AI understands this because it's seen thousands of studio photos with that exact setup.
The pose description.
I didn't just say "standing there." I said "left arm is bent, with my hand resting on my right arm." That's a specific pose. It's also a confident, composed pose. And I said "looking directly at the viewer with a confident and intense gaze." That tells the AI not just where my eyes are, but the emotion behind them.
The clothing.
I said "black turtleneck and tailored black trousers." This is minimalist. It's elegant. It's timeless. Black is safe. Turtleneck reads as intellectual. Tailored trousers read as professional. And because it's all black, the AI doesn't have to worry about color matching or patterns that might look weird.
The ar 9:16.
This is the aspect ratio for a full vertical phone screen. It's also the ratio for Instagram stories and many social media profiles. I didn't want a square. I wanted something that works on mobile first.

What I Got Back
The first image was startling. Not because it was perfect — it wasn't. My face was slightly off. The lighting was a little too dramatic. But it was the closest thing I'd ever seen to a real studio photo of myself.
I made a few adjustments. I realized I needed to specify "do not change my face" more strongly because the first version aged me by about ten years. I added "exact same facial identity" and emphasized that my hair should remain unchanged. The second generation came back almost perfect.
The third generation was the one I kept.
Here's what surprised me. The image looked professional, but not corporate. It looked like me, but better. The lighting made my face look more defined. The dark background made me stand out. The pose looked natural, not stiff. And the turtleneck and trousers — I don't own those clothes in real life, but they looked like something I would wear if I had better taste.
That's the magic of this approach. You're not generating a fake version of yourself. You're generating an idealized version of yourself. Same face. Same hair. Same expression. But in a context that makes you look like someone who has their life together.
The Mistake Most People Make
Here's what I learned the hard way. Most people try to make AI do too much. They say "make me look like a CEO" or "make me look confident and successful." Those are emotions and status signals, not visual instructions. AI doesn't know what "successful" looks like. But it knows what "black turtleneck and circular spotlight" looks like.
The other mistake is trusting the AI to preserve identity. You cannot assume this. You have to tell it multiple times, in multiple ways. I wrote "exact same facial and physical identity" and "do not change my face or my hair" and "use my pictures as a reference" — that's three separate instructions for the same thing. And it still took three generations to get it right.
The third mistake is using low-quality reference photos. I uploaded a selfie taken in bad light. The AI tried to fix the light, which changed my face. When I uploaded a decent photo taken in good natural light, the AI preserved my face much better.
When This Works and When It Doesn't
This approach works great for professional headshots, social media profile pictures, and any image where you want to present yourself in a controlled, polished way.
It does not work for candid photos. It does not work for action shots. It does not work if you want to look like you're having fun. Because the prompt is built for control, not spontaneity.
It also doesn't work perfectly with every AI tool. I used Midjourney with the "--cref" parameter for identity reference. Some other tools don't preserve identity as well. You'll need to experiment with whichever tool you're using and figure out how it handles face reference.
A Real Example
Let me give you a concrete before and after.
Before: A photo taken on my phone, indoors, with overhead lighting that created shadows under my eyes. I was wearing a grey t-shirt. The background was my living room wall. I looked tired. Not because I was tired, but because the lighting was terrible.
After: The same me, but now standing in front of a dark background with a bright circular spotlight hitting me from above and slightly in front. I'm wearing a black turtleneck and black trousers. My arm is bent and my hand rests on my other arm. I'm looking straight at the camera. There's a sharp shadow behind me that adds depth. I look confident, not because my face changed, but because the context changed.
The difference is not in my face. The difference is everything else.
What I Actually Took Away
If I had to summarize what I learned, it's this: AI is not a magic wand. It's a tool that follows instructions. And like any tool, the quality of your output depends entirely on the quality of your instructions.
The prompt I used is not perfect. I've adjusted it since. I've changed the clothing to a blazer. I've changed the background to a gradient. I've changed the lighting to something softer. Each time, I start with the same structure: identity, pose, lighting, background, clothing, aspect ratio. And each time, the result is better than the last.
What matters most is not the specific words. What matters is that you tell the AI exactly what to do and exactly what not to do. You lock in your identity. You lock in your hair. You describe the environment in terms of real-world photography — spotlight, shadow, contrast. And you use an aspect ratio that actually fits where you'll use the image.
If you're struggling with AI-generated artifacts or odd facial distortions in your headshots, you might find our guide on removing AI artifacts and watermarks helpful — it covers post-processing techniques that clean up the small imperfections that even the best prompts sometimes leave behind.
The Practical Takeaway
If you want to try this yourself, here's what I'd suggest.
- First, take a few good reference photos. Use natural light. Look at the camera. Don't smile too big or too small. Just a neutral, pleasant expression.
- Second, use a prompt structure like the one above. Start with your identity. Then describe the pose, the lighting, the background, the clothing, and the aspect ratio. Be specific. Use real-world terms. Don't say "good lighting," say "spotlight from above." Don't say "professional," say "black turtleneck and tailored trousers."
- Third, be prepared to iterate. The first generation will be wrong. The second will be closer. The third might be right. You're not looking for perfection. You're looking for "good enough to use."
- And fourth, don't overthink it. You're not trying to replace your identity. You're trying to present it better. The goal is not to look like someone else. The goal is to look like yourself, in better light.
That's it. That's the whole thing. A boring photo turned into a professional one using a single prompt. No studio. No photographer. Just a few words and a little patience.